Screen Overlay Detected: How to Fix [Step by Step Guide – 2019]
![Screen Overlay Detected: How to Fix [Step by Step Guide – 2019]](https://www.easyworknet.net/wp-content/uploads/2019/06/Screen-Overlay-Detected.jpg)
When we begin with Android Marshmallow, there’s a curious error that periodically exhibits its face; anyway, it might be hard to interpret what’s causing it. The “Screen Overlay Detected” issue is an annoying one since it won’t allow certain applications to dispatch; anyway it’s fundamentally all the more frustrating because it’s tricky what’s causing it.
Moreover, it’s an extremely straightforward fix once you perceive what’s causing the misstep: a feature which is usually found in Marshmallow and past that grants applications to “draw” over various applications. For example, Facebook Messenger utilizes chat heads in order to stay in the frontal territory of what is that you’re doing—this is the application using the “Draw over other apps” feature.
So to speak, it’s basically a screen overlay. Moreover, it’s already begun clicking, hasn’t it?
However, there are a few applications doing odd things especially when an overlay is adequately running, particularly if the application in question requires requesting new allowance. Android totally won’t allow it to be modified while an overlay is running, as such realizing the “Screen Overlay Detected” issue.
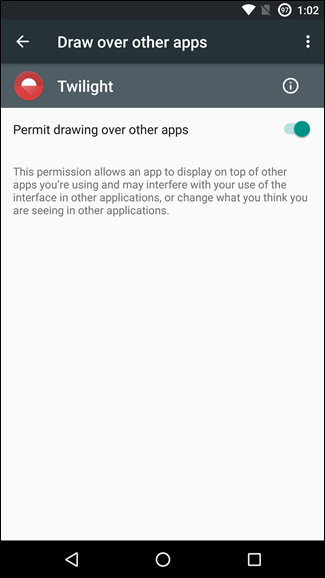
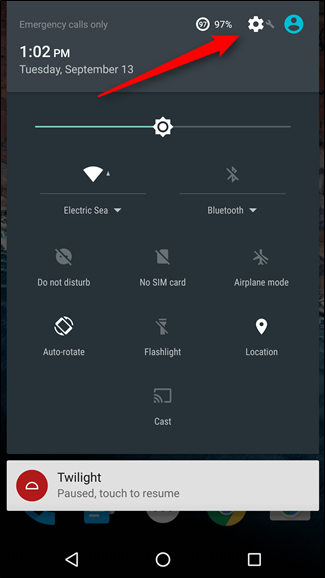
Apart from the above, if you install a new app and launch it for the first time while also having a conversation over a Facebook Chat Head, you will find an error just when the new app will try to request for its permissions. In the example below, I’m using Twilight—a “night mode” app—which simply utilizes a screen overlay in order to do its thing.
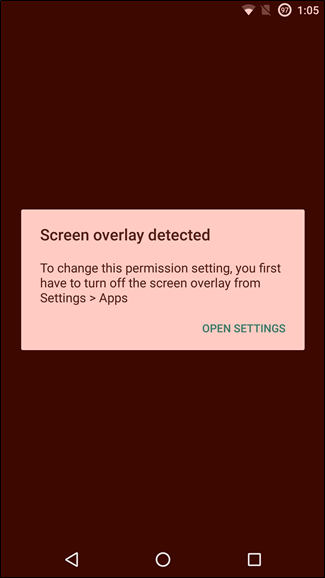
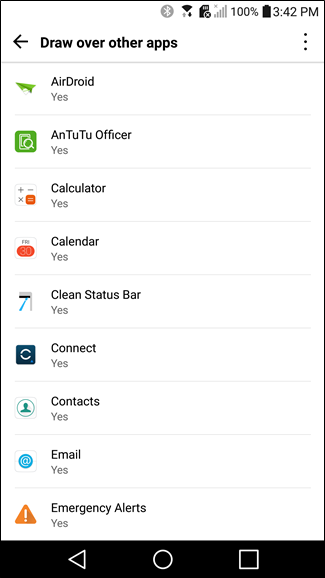
At present, from time to time when this error is created, it consists of an “Open Settings” interface which simply sends you into the “Draw over other apps” menu. The unforgiving part is that every application must be flipped physically—essentially tap on an application, slide the “Permit Drawing Over Other Apps” switch, and return.
You could even incapacitate every single one, and then again, actually could be super tedious, particularly in case you have numerous applications presented that can apply overlays.

Moreover, you’ll get to know which application has caused the contention, and you can disable only that one. So look for that internally:
1. What applications have you been utilizing recently? As referenced above, Facebook Messenger draws on the screen when it comes to chat heads, so in the case, if a chat head is effectively running; it’s probably your reason behind it.
2. What inactive applications do you utilize that keep running in the background? The same way, applications like CF.lumen as well as Twilight draw on the screen when empowered, so you will have to delay or incapacitate those administrations to dispose of the screen overlay blunder.
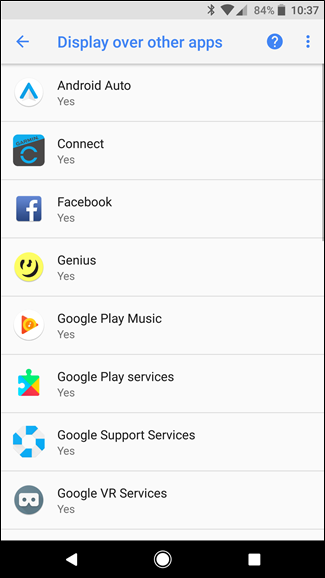
The rundown in the screen capture above demonstrates all the applications that have consent to draw on the screen. However, on the off chance that you can make sense of which one is really drawing on the screen when you get that issue, you can simply disable that one and proceed onward.
Obviously, that is not secure—in certain cases, it might be the case that more than one application drawing on the screen, which can be inconceivably baffling. Now, in that circumstance, I’d simply feel free to forbid every one of them, at that point re-empower them on an as-required premise. Moreover, it’s a pickle, without a doubt.
In Android Oreo, luckily, Google fundamentally made it extremely simple to make sense of what application is causing the problem with another warning that lets you know precisely what is showing over various applications.
How can you Access the “Draw Over Other Apps” Menu?
All things considered, how might you get to the “Draw over other apps” menu without getting to know the issue first and having that quick link? Or then again, envision a situation where there is no quick link. That part’s altogether straightforward.
The most problematic issue is the screen overlays setting are found in various spots on handsets by other manufacturers. Below we have the breakdown:
On Stock Android Oreo:
In case you’re utilizing Android Oreo, you will find that the Settings menu has been updated so most things are somewhat not the same as other newest versions of Android, including the “Draw Over Other Apps” highlight.
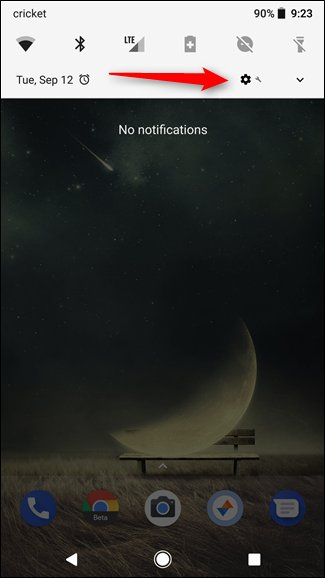
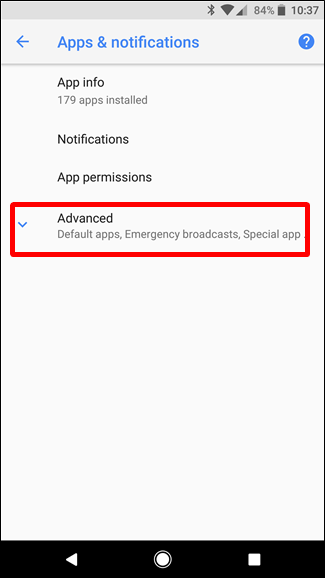
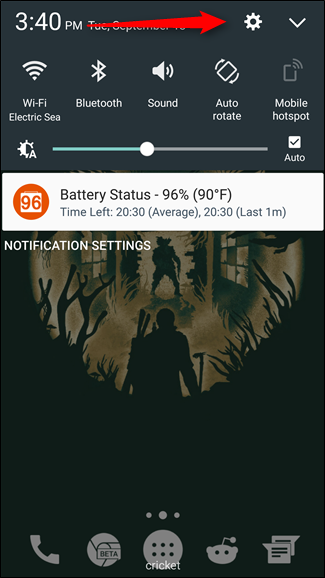
And hence, firstly, in order to begin with it, simply pull the notification shade and press the gear icon in order to open Settings.
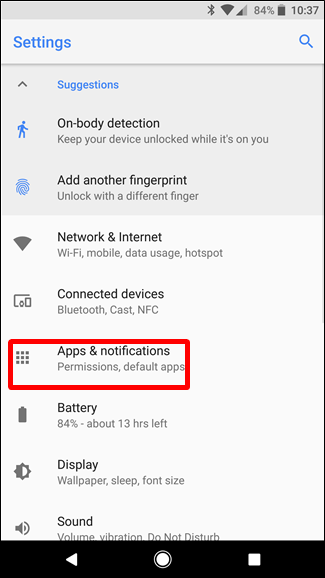
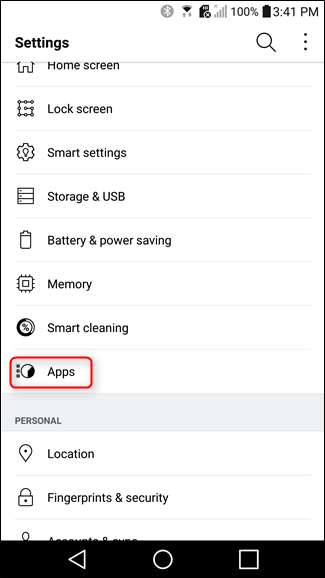
Now, from here, pick the category called as “Apps & Notifications”, and afterward press the “Advanced” button.
This uncovers extra alternatives, the remainder of which is the “Special App Access” choice. Feel free to tap that.
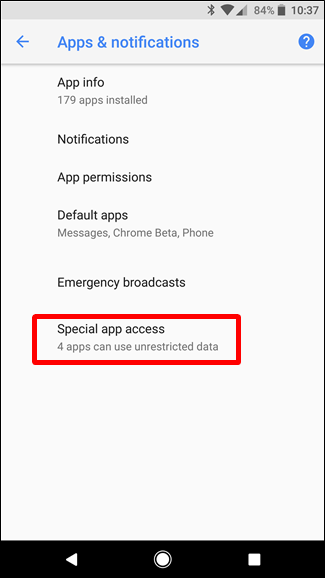
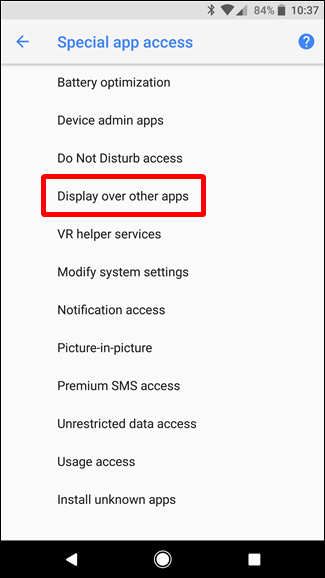
A little route down the menu, you’ll see the option saying “Display Over Other Apps”. Now, that is what you’re searching for.
On Stock Android Marshmallow or Nougat:
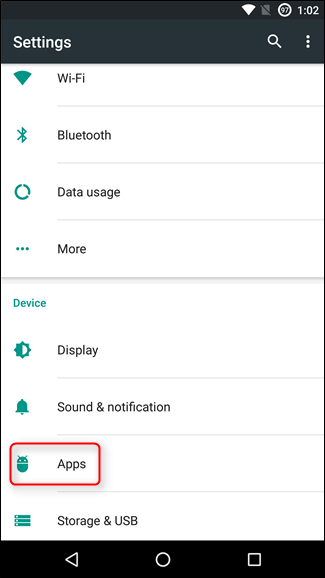
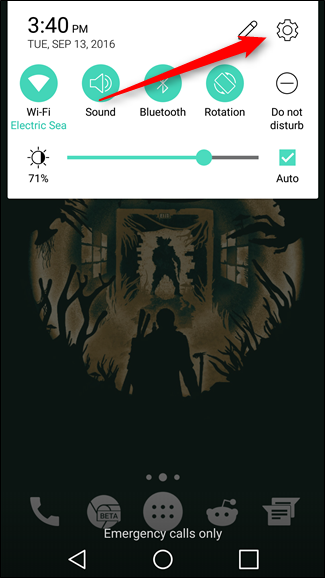
At first, on Stock Android, simply pull the notification shade two times and press the gear icon.
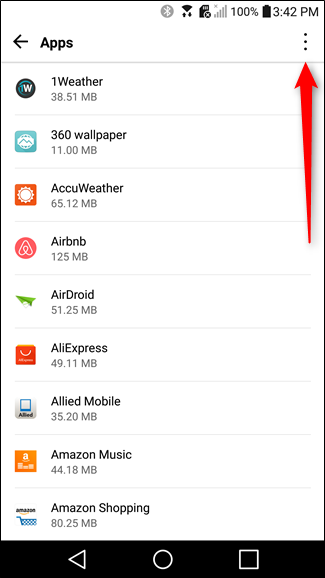
Now, from that point, move down to “Apps,” and afterward simply press the gear icon in the upper right.

Now, in this menu, go down and press the “Special Access” alternative.
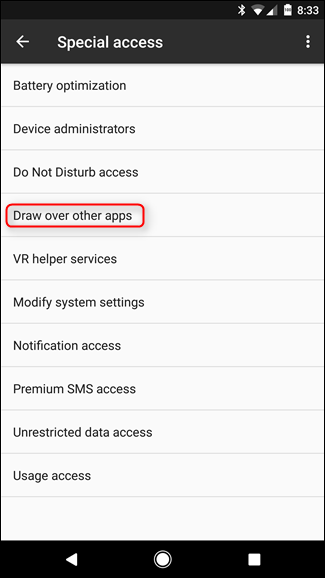
Moreover, don’t ever hesitate to flip things here to your deepest longing. Simply open everything in order to enable or disable them. From that point, you’ll discover the “Draw over other apps” menu. And that is the very thing that you had been searching for!

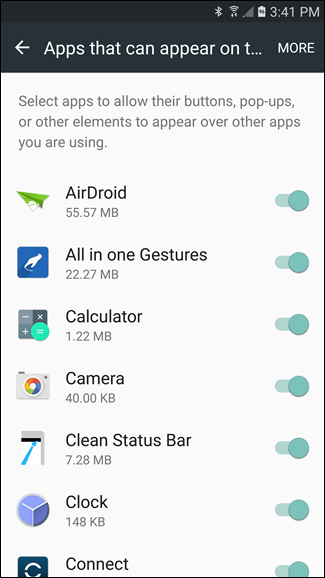
On Samsung Devices:
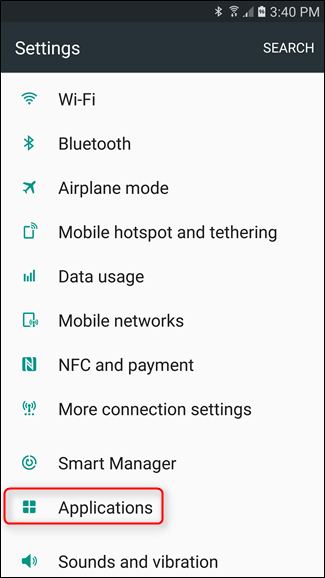
At first, simply pull down the notification shade and then go ahead and press the gear icon, and then using the scrolling go for the “Applications” option.
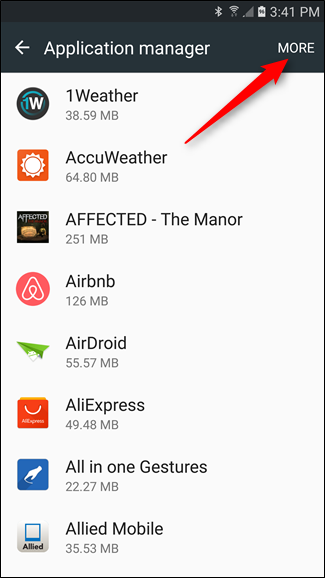
Now, from this point, simply press the link saying “Application manager”, and then press the “More” button situated in the top-right of the screen.

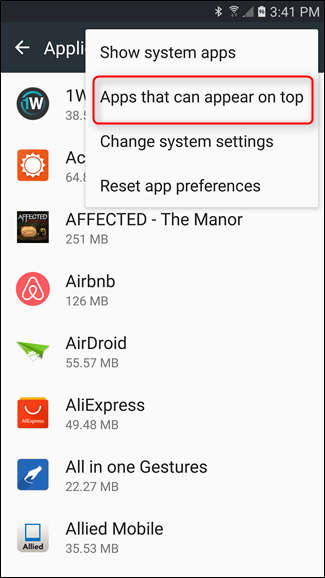
In the next step, go for the selection of “Apps that can appear on top” option and, voila, you’re done. When it comes to Samsung, it also makes it even simpler with the addition of the toggle beside the name of the app, and definitely not in a different menu. Well, a huge “Thanks” to Samsung for that.
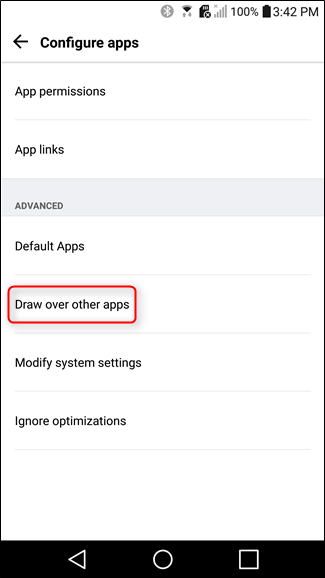
On LG Devices:
Now, once again, simply pull down the notification shade, then gently press the gear icon, and then move ahead to the “Apps” menu.
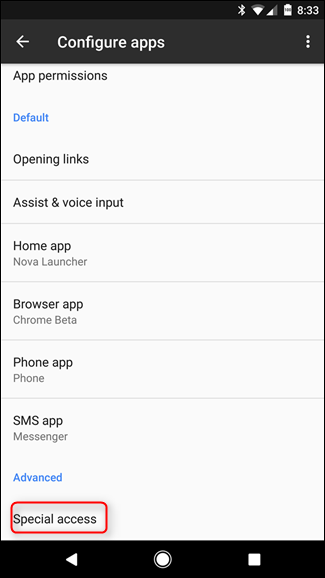
Now, simply press the three-dot overflow button, and make a selection of the “Configure apps” option after that.
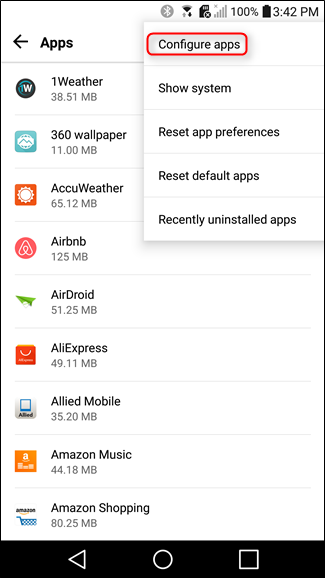
And from that point, it must be working just like stock Android—press the option that says “Draw over other apps” and you’ll be able to find yourself where you should be.
Moreover, if you don’t find yourself so sure about what’s the cause behind the “Screen Overlay Detected” error, you might end up throwing your phone. As a matter of fact, there have been friends of mine who experienced this error (and subsequently question me about the same) than just any different error! And in the end, here you have the solution.
How to Fix Android Screen Flickering? – Fix the Random Phone Display Flashing
Have you been figuring out ways to deal with the unexpectedly tricky screen flashes of your Android screen? So, how to fix android screen flickering? Well, before you freak out, take a look at our complete guide on the most ideal approach to fix Android screen flashing issue the easiest way.
When we think about the previous times, there used to be really basic software and hardware wasn’t initially top-notch, screen flashing issue frequently suggested hardware issue. Since we now carry these mini PCs in our pockets as phones, the Android screen flashing issue has ended up being dynamically wild with a huge list of forums that are stacked up with a focus on customers.
But, the issue of the Android screen flickering could not be pointed toward the hardware in a direct manner, as it may very well be anomalous conduct when it comes to the setting and not the hardware of the phone. Try not to panic! It’s anything but an issue with neither your cell phone not the Android OS. Moreover, on each advanced Android with a brilliance sensor when the screen is on low splendor, perusing makes the screen flash.
So, just in case you do experience this situation, rapidly post on our forum in order to check whether you can fix it yourself or not.
What is the reason behind the rise of the Android screen flickering issue?
Well, the key explanation behind the Android screen flashing issue is that the operating system can’t choose among the hardware GPU or software CPU. The issue is progressively normal especially when you are looking for applications.
Moreover, this experienced a flickering issue while opening applications that are small and while browsing on the Chrome app or when utilizing the screen of your phone.
How to fix Android Screen Flickering Issue?
In the case, if the issue of a flickering screen display emerged in the wake of introducing a lot of applications or simply out of the blue, you can hold off the visit to the service provider for the time being. Here’s our easy-to-follow guide on how to fix Android screen flickering issue effortlessly:
Method 1: Boot the device in Safe Mode
Built into the Android OS, a fail-safe feature, the safe mode allows one to return to the stock Android device that you have just got out of the box and testing out any of the abnormalities that you have been facing lately.
So, whenever the Android screen flickering problem comes up, your device could be put to safe mode. Moreover, make sure to check to see in case the issue still remains and then find out accordingly.
- At first, from your Android device’s home screen, tap & hold the Power button till the time you see the pop up of the power menu screen.
- Now, on the menu screen, gently tap and hold the Power button icon till the time you see the pop up of the safe mode menu appearing on the device’s screen.
- After the above, you will be asked by the screen to confirm if you like to “Reboot to safe mode”, so make a call and go ahead and tap the “OK” button in order to boot the Android device into the safe mode.
- So, once your Android device will boot into safe mode, each of the third-party apps that you might have already installed onto your Android device will get hidden as well as disabled.
You will most likely be left with only the stock apps, you will be given the room in order to see if the Android screen flickering issue is related to the app or the hardware.
Method 2: Changing the Developer Options
Aside from all the amazing hidden features that are offered by Developer options, there are a few choices in the menu that can enable you to fix the flickering of Android screen. Designer alternatives enable you to disable choices, for example, Disable HW overlays as well as Show surface updates, which have been related with Android screen flashing issue by various customers.
- If there are no Developer options enabled by you already, you may want to so simply by going over to Settings >About phone and then simply press on “Build number” 7 times.
- Once you do the above, the Developer options menu will get added to the Settings app’s bottom, so you can access it or/and scroll down to the Drawing
- Now, when it comes to the Drawing section, the first tab under it should be showing surface updates, so gently tap the toggle switch which is right next to it if the option has been already enabled.
- Also, in the same way, make sure to use the Developer options menu in order to find the rendering section which is accelerated by Hardware on the screen.
- Now, under this rendering section, on the screen, you might get to find the Disable HW overlays option.
- So, tap the toggle switch which is right next to it in order to enable to option and then simply set screen composting to just GPU.
In most of the cases, the issue of Android screen flickering takes place when the system hardware flips between the CPU and the GPU in order to display the content on the device’s screen. And hence, with the toggling on the Disable HW overlays choice, you will be able to manually remove the issue of Android screen flickering just by keeping the display operation under the GPU.
Method 3: Disable Adaptive Brightness on Your Device
The Automatic/Adaptive brightness option simply suggests that the screen’s brightness changes as per the light outside. And hence, when you cover the photometric sensors of your smartphone, the screen of it becomes really dark and at times when they are uncovered, the screen of the smartphone becomes bright once again.
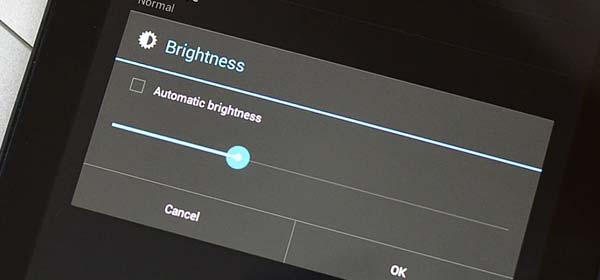
- First, head to the Settings > Display > Brightness
- Then find the option which says Automatic/Adaptive brightness and then simply deselect it.
And hence, if the screen flickering issue is basically related to the brightness of the screen and is way more transient that instant, this may not prove to be the right solution you’re looking for. Moreover, if nothing from the above-mentioned methods seems to work for you, you may find the need for considering the last resort.
Final Resolution – Get Your Android Screen Flickering Issue Checked
Since none of the above-mentioned methods seemed to help you in getting the resolution for the Android screen flickering issue, you might want to consult a service center and get your phone checked. There could only be the hardware problem, which suggests you will require to get the replacement for the front glass panel or/and the entire display screen done.
Moreover, depending on how old your mobile device is and other things, the replacement of the hardware parts may cost you a fair amount. However, there are some cases where the screen is not what has been damaged, but it could be the proximity or/and brightness sensors, which also will require you to take your phone to the customer service center. However, it may cost you a little lesser in this case.
In the case, if you have a device which is out of its warranty period and you are completely cool to go for an experiment, you’ll be able to find various experts here on the XDA Developers Forum which would find the best fit for your device’s issue.
All in all, these are also those experimental means which need somewhat of knowledge about repairing and some willpower as well, so it’s suggested to move forward with caution.
How to Get your Files Back when the Screen Keeps on Flashing?
You additionally need to spare the device files to evade them from being gotten to when your smartphone’s screen flashes. The Android Data Recovery may help you in recovering documents or files on the smartphone especially if you aren’t ready to touch the screen of the device to operate it.
- After the download of the Android Data Recovery software is done, simply open it and then click on Android Broken Data Recovery. Now, make a selection of all the files you need to restore.
- Now, you will be required to make a call on some options on your smartphone model, the file type, as well as the fault type so you can retrieve your data/files.
- The software will simply analyze your device.
- The software then begins to retrieve the data/files; you will be allowed to see the display of the file names, the details which come in terms of their size, artists, album, etc. of the format of the pictures or of the music.

There’s something beyond one approach to backup your Android smartphone, and we need you to know about the entirety of your alternatives. And hence, make certain to look at our guide on how to backup your Android device so every one of the alternatives is on the table.
Scarcely any things are more disappointing than an Android device when they don’t seem to work; however, having an issue of Android screen flickering isn’t the end of the globe.
When you simply rule out the reasonable applications, check out the sensors, and hightail it over to your closest service provider if that is required, you’ll be back fully operational in the blink of an eye. Meanwhile, you can utilize the procedure trusting that Android will discharge a lasting answer to recover information and to dispose of the flickering issue for good. This average fix for this issue is found to work for most Android devices.
In the end, we hope that the instructional tutorial will enable you to resolve the issue of flickering and the flashing issue.


